Saturday, December 10, 2011

Christmas Dress Finished!


Here's a preview ya'll i'll be sure to put more up real soon. Just wanted to share and do a mini post. I loved making it and its just darling on her! Again no pattern required just use my "no pattern technique"
 Happy Saturday!

Wednesday, November 30, 2011

The Start of A Christmas Dress


Im working on my daughters christmas dress and with this project I decided I would take my time, and make it extra nice. That means no raw edges showing on the inside! This way of thinking lasted for quite awhile, then I decided that was silly and really a waste of effort. I decided all of this while just working on the top part of the dress. :) Im designing it all myself, with some inspiration found here and there. Its taking awhile but hopefully the love im putting into it will translate into style and quality. Hopefully. The black silky material is going to be a big sash tied around the upper waist of the dress, separating the top part from the skirt, which will be this plaid silky print. All the fabric was from walmart, some of it even the $1.50 rack stuff. Honestly I didnt even go to Walmart thinking of getting fabric but when I saw the plaid for that cheap a million Christmas Dress ideas started floating in my head. I bought some red tulle to puff up the bottom of the skirt and make it really full, im planning on letting it pick-a-boo a little out of the bottom of the skirt.
All i've gotten done so far is the top but i'll be sure and update when its complete.
Happy Sewing
~PNK

Wednesday, November 23, 2011

Sweatshirt Upcycle

I found this XXl Old Navy Sweater at my home town thrift store and knew right then and there that it would be perfect to make into a dress for Emrey. I am so thankful for my home town little second hand not for profit shopt! Where i live now its a different story, she jacks up prices and wont negotiate :(. I still really love going in there though, im always hoping to find something fun to upcycle or paint...you just never know what youre hoing to find in a thrift store, i love it!
All I had to do was use this: no pattern technique and went from there.

I cut an inch up from the band of the sleeve, at an angle, for the collar.

Aisle to Aloha


I situated the collar on the inside of the neck of the dress, pinned it, then flipped it upward
so I could sew it onto the dress (photo below)

I did this to both the front and back of the dress


It turned out really cute. Word of advise, DONT add 1/4 seam allowance, I did and regreted it.
I ended up having to take it in because it streches well and was waaay too baggy. Enjoy, have fun, mistakes
will always come along, let yourself make them, then let them slide off your back.

Saturday, November 05, 2011

Saturday...Saturday, Saturday


This is my weekend in photographs :)

This baby quilt was made completley out of thrifted sheets. Dont you just love the print on the
vintage floral sheets?! I fell in love, this is going to be the softest baby quilt ever. I have someone very special in mind, if its not a baby girl I have many other options with all these babies in my family on the way!
A new necklace, with one of my favorite colors in it....Coral.


my daughter was licking all the good stuff off then laying the soggy ones out before her. Kids are soo silly, they
do all the things adults wish they could do but dont.


Monday, October 17, 2011

Crib Rail Protector Tutuorial

 
I have to say this is one of those baby things that I should have made or bought
that never crossed my mind. Its a crib gaurd.  A gaurd against what you may ask?
Well My 15 month olds teeth. For some odd reason she started chewing on her crib rails,
either before she goes to bed or when she wakes up, im not really shure. It honestly grosses
me out in a "nails-on-a-chalk-board" kind of way. I just imagine the grittyness of splinters of
wood in my mouth and get all tense and yuck feeling. I really didnt know what I could do to stop
 it either. I couldnt really catch her doing it or anything because i've never once walked in
when she was doing it. I threw around the idea of rubbing something nasty tasting on the rail
 so she would never want to do it again. I figured that anything gross enough to make her not
chew on it would probably take the varnish right off and ruin the wood.....soooo
I kinda just didnt figured i would'nt end up doing anything. Yesterday while dinking around on
Pinterest
I saw a pin that caught my eye. It looked like a tie on crib rail cushion, it was just on the front rail
so im assuming it was for mommy's arms when shes leaning over to lay her baby down.
The cushion sparked an idea and that same A.M. I was measuring and cutting fabric
for this teething gaurd. For some very odd reason my daughter has only marked one side as her
chewing territory so I just made one rail gaurd for my crib.


Crib Protector Tutorial

What You Will Need:
Measuring tape
Sewing machine
Fabric
Buttons
1/4" Elastic


Step 1:
Measure the length of the rail(s)
[mine was 27"]
then
Measure the wrap-around width of the rail, take your measuring tape and 
from one side of the rail wrap completley around to the other side of that same rail. This is going to be the part of the rail protector that hugs/wraps around the rail
 [mine was 7"]
Add a 1/4" to each measurement for seam allowance
So my measurment for rail gaurd was 27" long by 7" wide

Step 2:
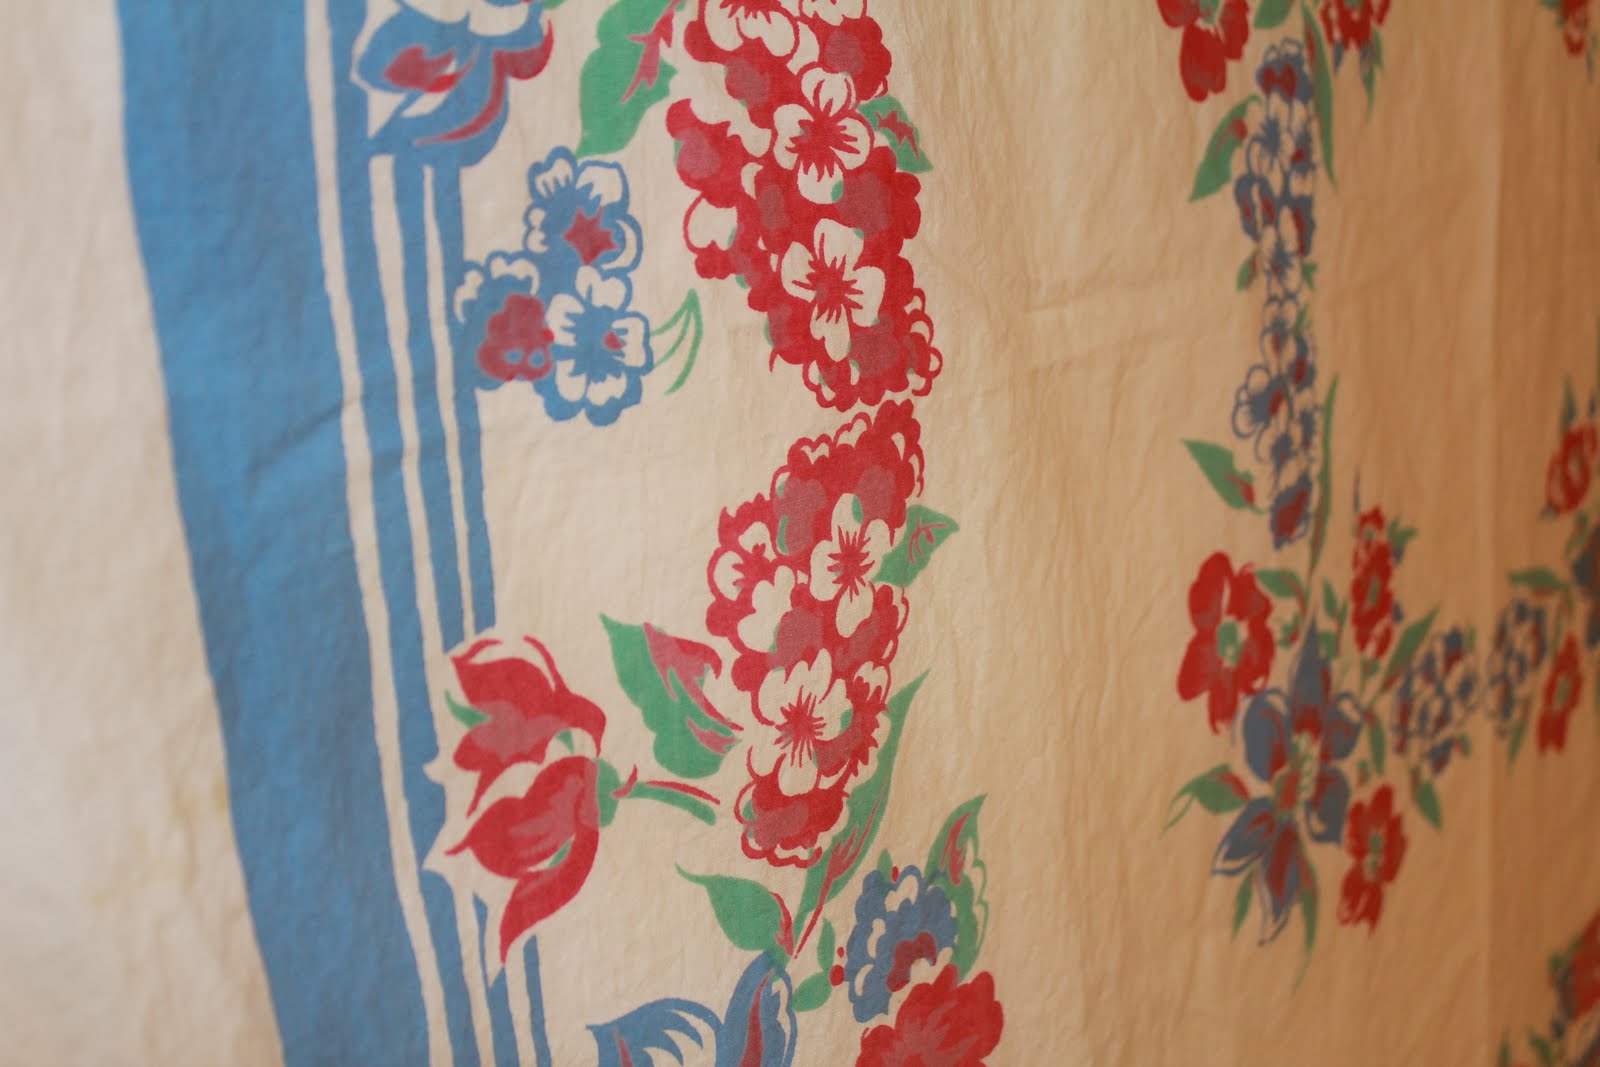
You can go two ways with this part. You can either do a patchwork one like I did.
To do this you simply cut a bunch of fabric and sew them together.
I just cut the fabric chunks 7-1/4" long and made a bunch of varying widths that
equalled, sewn together, 27-1/4" long
or
Cut one piece of fabric to the exact measurement you needed.
It really just depends on the look youre going for.

Step 3:
Cut a second stip of fabric the size of your measurement (add 1/4" seam allowance to both sides).
I used a fleece material just so it would have some padding to it.
[again mine was 27-1/4" by 7-1/4"]

Step 4:
Lay the first piece of fabric flat, facing up. Then lay, face down, your second piece of fabric ontop of
your other piece. match your corners. Pin together.
Sew together LEAVING one of the short sides unsewn. (my short side was my 7" side)

Step 5:
Turn right side out by reaching into your unsewn short side and pulling outward.
To finish sewing your short side take the top of the fabric and tuck it into itself a 1/4"
Tuck/ fold it inward all the way around that short, unsewn side. pin the tucked part.
Sew the tucked part.

Step 6:
Now take it to your crib and set it on the rail.
Mark 4 spots to put your buttons that are not blocked by the rails that are
running up and down.
(If your making a rail protector for the longest front of back rails add 6 spots for buttons)
Now sew your buttons onto your marked spots, on the outside top part of your fabric, the long end. You'll want the buttons to show and thats why I said top part.


Step 7:
Cut 4 strips of  a 1-1/2"  elastic.
On the back side of the oppostite end from your buttons lay your elastic.
Loop it so that when you sew your elastic down it will make a loop.
Sew all your elastic down.


You're done!
Now just Wrap it on your rail by taking your elastic loops and wrapping them under the rail then around the buttons.
See 3rd photo from the top for a close up of what I mean

Saturday, October 08, 2011

Beginners Full Skirt Update


to view original post and the tutorial for this skirt go

I made this for a friend, I loved the material the picked out. I think it turned out really cute. She is about a foot shorter then me :) so it will not be this short! My husband said it looked like something he would have to talk me into buying at a store. Hes the sweetest.
Happy Sewing


Wednesday, October 05, 2011

70's Tunic Out Of Thrifted Clothing


My daughter was needing some long sleeved shirts for this fall and winter, so here is the first of many shirts her mamma will make her. She is the first of my husbands and I's kids (and only for right now), the first niece or nephew for my siblings, and the first grandbaby for my parents. Needless to say I have had to buy very few clothes, she has the largest wardrobe ever. Some mornings its a little chillly though and i've been fumbling as to what i'll put her in and since I live in the middle of nowhere, shopping trips must be planned. I wanted to make her some new outfits anyways, i've really been neglecting my friend, the sewing machine. For the pattern I simply "hacked" a dress she already had (which I explain 2 or 3 posts back) and shortened the length a little.


This thrift store find was the fabric i used for this tunic. I just love upcycling clothes! I'm pretty happy with how it turned out. Its sorta 70's, pin a feather in your hair-ish, and im groovin it :) haha im a dork. I wanted it a little longer but I miscalculated a little and thats alright. I added a little white pocket so it wouldnt be too, "blah", out of an old t-shirt of her daddy's. It'll be so cute with a white pair of leggins!


Yaaaah for Fall!


Thursday, September 22, 2011

Old Becomes New

I love taking an old thing and giving it new life. It really feels good to take something that is unused and going to rot and making it into something you can use and even just look at. This weekend I found this


I guess it used to be a window screen, its around 2' X 4' im guessing. The moment I saw it I knew I could do something fun with it! Its pace is now above our bed with a "W" hung to it, mabey one day a big canvas portrait of our family....who knows. If I had a larger room I would have loved to hang hooks on it and made it into a jewelry hanger/display. Oh well a girl cant have everything!


Wednesday, September 14, 2011

Hacking....The Fun Kind

Since I've been sewing I've only ever bought one pattern. I found out how to "hack" patterns and that's been my only way of sewing. Basically you trace an existing garment and use that as a pattern. No $5 patterns, which is soo nice, and really does make, making clothes cheaper then buying.
Here's a tutorial by MADE on just how to do it:
http://www.dana-made-it.com/2008/07/tutorial-make-your-own-pattern.html

Make sure And add 1/4 inch all around for your seam allowance. Pretty much like I didn't do for this little number. It doesn't fit around her trunk unfortunately. Bummer. I didn't quite take into account that their was no stretch in the fabric I used. It's all part of the territory, I mind messing up in alot of areas. I never kick myself to hard for the mistakes I make in sewing and you shouldn't either, just have fun enjoy creating.


Thursday, September 01, 2011

Corn & Black Bean Salsa

I had never Canned before and thought it was super technical and hard but this woman made it sound really simple so I just had to try it! It turned out beautifully, and fairly simple. Its the time of year here in Kansas that people give you loads and loads of sweet corn which was he case here. I just love free Stuff! I'm really glad I found something creative to do with it too.
Enjoy!

http://emilysoven.blogspot.com/2008/10/black-bean-and-corn-salsa.html

Monday, August 29, 2011

Tai Chicken Salad


photo source: Taste of Home
So my new obsession is Asian Salads, I just cant get enough of them!
Im really not a huge salad person so that shows you how good they are. I love how easy they
are and how with meat they make a whole meal, no sides necessary.
This weekend while garage sale-ing I came across a bunch of "Taste Of Home" magazines for free, this recipe immediatly caught my eye.
Tai Chicken Salald
It worked out so great for a saturday lunch, I just hate spending the weekends cooking the whole time so an easy recipe is always welcome. This one definatley hit the mark!
I used Krafts "Asian Toasted Sesame Dressing" which is soo yummy

Friday, August 19, 2011

New Fabric: Such Endless Possibilities


So I was on a walk today and walked right up to an estate sale. I love estate sales, when you get over that an elderly person either died or got put into a nursing home, theyre nice. You can usually find great sewing things. The last one I went to (I also was walking and came acrossed it too) I bought a basket full of thread spools and buttons for like $1. The facric I got today I think is supposed to be a table cloth.  I have some better plans for this puppy though and for only 25 cents I cant mess up. Its so 1950 I love it. I  bought the softest, oldest, warn out quilt ever, also. Its so pretty, its mostly white with some really light colored star blocks. I love it, i should have taken a photo of it and put it up also. Oh well, im too lazy. Im thinking a skirt for me out of this fabric, what do you think? A dress, with the top part made out of red fabric, or a skirt for my little one, a hobo bag, or mabey a childs blanket?

Help me out, what would you do with this?


Tuesday, August 02, 2011

Go Ahead & Do It


1) "Elastic Band Empire Waist Dress" By: Smashed Peas and Carrots
2)"Ice Cream Social Skirt" By: iCandy Handmade
3) "Simple Summer Dress" By: While They Snooze
4)"Full Gathered Skirt" By Gerties New Blog for Better Sewing

----------------------------------------------------------------------------------------------------------------------------

I did not make one thing for myself when I first started sewing. Everything was always for someone else. Which I really enjoyed doing dont get me wrong, but it seems like the things we are good or best at doing we reserve for others. For example my husband absolutely loves my Strawberry Lemonade, Fruit Pizza, and many other of my special meals/ treats but the only time I make those special things are for when im taking them to other places. I guess because im best at them I save making them for special occasions. I really shouldnt do that, I should make them more often then I do, like during the week for no particular reason. Sewing has been that way for me, I make special things for my daughter or for a gift for friends and family. In June I finally did something for myself and now i've sewn 3 or 4 things for myself, and its been realy nice. I dont think im being selfish at all, I think im just treating myself a little and becoming more deliberate in makeing sure I skim a little off the top for me. If you have never done anything for yourself for whatever reason try creating one of these little numbers just for you. I very purposely picked simple and easy projects so you have no excuse :)
Come On
Go Ahead & Do It!

"Tube Top Summer Dress"
See its fun making things for yourself!
I made this without a pattern in about an hour. The fabric was only $1.50
per yard! I firgured this dress with all the material and elastic cast less then $4 to make!
Sorry for the bad Photo my camera died so I had to use my cell and my hubbs was gone so I had
to use a mirror :)

Thursday, July 28, 2011

Love


All from when we were young(er)


Our love story is not the typical kind. We didnt meet in college, you didnt ask me out the moment you saw me for the first time, and we didnt have the easist start. I wouldnt change one thing about it!  I dont even like to wonder, im afraid that if one thing had been different we wouldnt be were we are today. I wouldnt have all that I have with you if it hadnt happened the way it did.


The Start

  You were just some cute, scrawny sophmore transfer student, with the best onrey grin when we first met. All I thought about was you, I loved walking past you in the halls. I loved your mean teasing, I loved the way you smerked at me. I loved that you were the first person to make me blush, a thing I didnt even know I could do before you. I loved that it took you two minutes of our noses rubbing to finally lean all the way in for a quick kiss. Oh I just loved YOU.
 
   You transfered back to your old school and my heart sank when I saw you grabbing your things from shop class. When I finally saw you again as a Senior, I knew you wouldnt ask me out. We flirted that whole basketball game and I couldnt believe I was seeing you agin, I couldnt believe you were teasing me again. I got brazen, I didnt care, I had to date you. I asked you for your number and you wouldnt give it to me, you thought I was teasing you. I asked again, again, and again, until I got those 10 digits that I was absolutley dying for. We met up that saturday in March of 2006, for a date and I climbed into that pickup with you and I swear I never got out. Every second after that you have been all I have thought about.

  When you asked me to marry you I knew it was forever. I remember not caring one bit about the wedding. Your sisters who were trying to help me would ask about a certain flower or fabric to decorate with, my reply was always the same, "whatever you think." All I cared about was walking out of that sanctuary with your last name. I still cherish it, and hope that I bring it honor and never bring it shame. I love you dear, I pray  you understand why when it comes to us I wouldnt change a thing.

  I still love you for your onery boyish smile, but I love you even more for the man that you've grown into. Your so strong, and the bravest man alive. You have such integrity and I respect you so much for that. Thank you for working so hard all the time for your family, thank you for being such a great, loveing Father.  Thank you for all those second chances, thank you for giving me our daughter.
Happy Four Year Anniversary!


Related Posts Plugin for WordPress, Blogger...