Wednesday, March 30, 2011

Correction

This is a correction to my post on March 29, 2011 "Stacked Coin Quilt Progress"
The link to Moda Baking Shop that I used was wrong, wrong, wrong. Heres the actually link:
http://www.modabakeshop.com/2009/02/stacked-coins-baby-quilt.html#more

I fixed it in the previous post, but it had already sat on their for a day...soo, sorry
heres the link I accidently put up:
http://www.shop.justicejuels.com/category.sc?categoryId=8

this is a sweet shop though, the proceeds go to fight sex trafficing
I had sent the link to a friend earlier on so that explains why it "pasted." Sorry to anyone
I confused. You'll get over it when you see the cute necklaces!

Tuesday, March 29, 2011

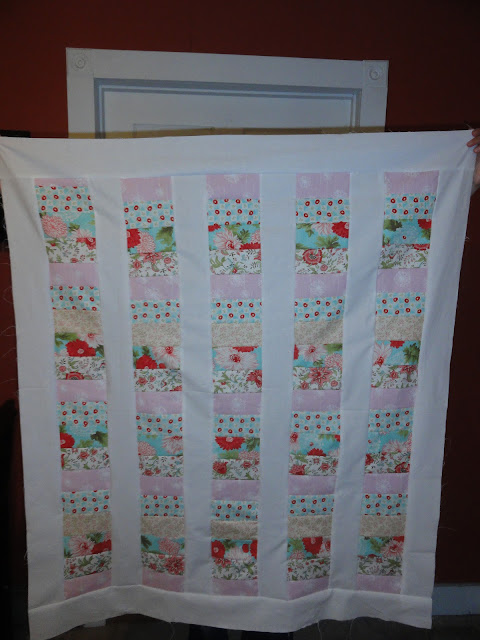
"Stacked Coin Baby Quilt" Progress

    I have wanted to learn how to quilt for awhile, it was this nagging thing in the back of my mind. I learn everything online, I wasnt blessed with my granny across town who could show me how to do this or that. Ive had to learn through tutorials, blogs, and even an instructional DVD that came with my sewing machine.  Ive learned everything I know (which is very limited) in the past 6-8 months, because people were sweet enough to put what they know in their Blogs. Thats why im doing mine, I want to pay back what others have so genorously given me. I know there are other people out there who want to learn but have no one to teach them.
   Thats exactly what I was waiting on, thats why I took so long to figure out how to quilt. Unlike all the other stuff I learned, I didnt think I could learn this by reading and seeing pictures on a screen. I wanted someone to teach me, badly. Finally I decided I would teach myself the same way I did with the other stuff, and I have  (so far) all thanks to "Moda Bake Shop" and the sites they showed.
http://www.modabakeshop.com/2009/02/stacked-coins-baby-quilt.html#more


   So here is what I have done so far. I only have the front done , and im going to have a shop here in town quilt some  designs into it. The back is going to be pink "minky" fabric and the binding is going to be pink with jumbo white polkadots.


   Its for my husband and I's friends who are getting ready to have a baby girl.  They did so very much for us when we had our little one.  They drove over to be with us when I was in labor at the hospital and had just found out that our Brother-in-law, who had a 3 week old had just tragically died.  They made signs, that read "Welcome Home Emrey", and set up our house with gifts and cupcakes for when we arrived home with our new little baby. I just love that family so much and wanted to give them something special so that they can hopefully feel how much we love them! So for their little one, they get my first quilt. :)


   Its not perfect by anymeans but I did it with love. I am beyond excited about this thing. No matter how intimidated by a project you are, give it a go anyways. You will be surprised by how much you can do that you once  just knew you couldnt!  I promise.


~PNK

Sunday, March 13, 2011

Kitchen Design Ideas

I get into weird phases where I will obsessivly look up random things for hours on end, for a week or so. When I was pregnant it was Nursery Ideas, then when my daughter finally arrived it was Tree Houses. Yeah thats right, tree houses, she couldnt even hold her head up and i was already dreaming of her climing a ten foot rope ladder into her Tree-Top Fort. Thats kinda embarrassing to admit. My new obsession now  is decorating a kitchen/dinning room with these colors: Chartreuse, & Gray, with white cabinets, and some pops of black to make the green really pop. (and because i already have a black table and getting rid of it would be silly)


 With some Custom Ribbon-Tie Curtains, made by non other then me


In this fabric: "Blossom in Chartruese" by Ty Pennington, with the ties being Gray 


And a Drum light centered above the black table, in this fabric: "Impressions Lace in Gray" by Ty Pennington (shown on right) I found an easy and cute Drum Light Tutorial @
Beacause after pricing Drum Lights homemade was the only sane way to go!


I'm thinking this shade of Gay on the walls: benjamin moore "stonington gray"

With some white Cabinets


I should of been an interior designer, who knows mabey when I grow up :) OR mabey i should just get a hobby and not let my dreaming become an obsession :)

Oh wait heres the best part!


A Mirror Carved out of real Bones, by Ballard Design, very pricey though

Tuesday, March 08, 2011

Simple Baby Blanket Or Throw


   Boys, Boys, Boys! A bunch of boys have been born in the past couple weeks. One of which had no boy blankets. With every day, and with every pink or purple blanket, swaddled around him, I could feel his Dads annoyance escalating. Something had to be done! Oh and not to mention this was my nephew that was 2 weeks old and I still had no gift for. "Worlds Best Aunt," right here!
  So I was at Walmart (imagine that) trying to pick something out for all these boys that i mentioned earlier, I wandered over to the baby blanket section, to take a look. "Mweeh," very average, somewhat boring blankets hung, with $12.99 price tags. (price wasnt an option, but im not going to spend $ on something thats boring, and not right for the lil guy, just so i have a gift to give) So I then decided to go check out fabric, cuz an idea was brewing. I found some cute tractor/backhoes print fleece and some yellow flannel to mach, which added up to a little over $12.
  This is around 2:00 pm, I had to bake some homemade breadsticks, cook a dinner for a family thats had a lot on their plate, (they had a boy 2 weeks before, and have had complication after complication) pack for a trip, and take the dinner to the families house. All by 6:00pm. Now I Wanted to get this Blanket done too. Umm pretty much i am super women. I got all that done, made the blanket, AND a Lovey for the baby boy thats had some complications and is still in NICU. I actually got it all done by 5:30 to be exact, and no im not tutting my own horn :)

So enough about me, lets talk about this blanket. Heres the Instructions

Supplies:
2 yrds of fabric (2 diff kinds, 1 yrd a piece) Double fabric for  a throw
sewing machine
Pins (haha Pins, Needles, & Kids I finally get to use one of the words in the title)
Rotary Cutter OR sissors
something "round" (for tracing)

Start to Finish: 45 min -for normal people 25-30 min

Insructions:

1) Lay 1st fabric down, wrong side up, smooth out bumps. Lay the 2nd fabric right side up, ontop of the 1st fabric. (wrong sides will be touching)  Gently smooth out any bumps. Try and match the Corners and Sides.

2) Pin the Corners and 1 pin each on the tops and 1 pin each on the sides. Just so the fabric doesnt move around

3) Take a bowl, or big lid and place on the corner of the pinned material. Cut around the Lid so you get a rounded corner. Repeat on each corner


4) Starting  a little before a corner, take the bottom piece of fabric and fold 1/4 inch-1/2 inch inward, hold down. Do the same with the top piece of fabric. Pin the folded pieces of fabric together. Work your way toward the rounded corner. Pin every couple inches. When you get to the Corners, pin all the way around.


pinning edges together
 
pinned corners


5) When the entire blanket is pinned, start sewing. I used a straight stich. It might make it more Jazzed up to use a decorative stich, like a big Zig Zag.

6) Enjoy! Make sure all your pins are pulled out, check and double check  :)

my little trying out her cousins blankie

Tuesday, March 01, 2011

Tutu - Its Another No Sew


Man its been forever! I havent quit crafting but i did kinda go on a little bit of a blog hiatus. Ive been working on a baby quilt/ teaching myself how to quilt and its ate up alot of my time. (and i havent even started sewing it yet, this is all the cutting!) My husband was also out of the country and while he was gone I stayed with some of our family so me and the little wouldnt be so lonley. Soo here you go, I decided i would share this super easy Tutu with y'all. I really just feel bad about not putting anything up latley. This is a project I did about a month ago. Its super easy and a fourth grader could figure this one out. No offense to all you fourth graders out there! Enjoy

heres the blog i found to be the easiest
i just super glued the elastic instead of sewing it, since elastic and my machine are arch enemies. I find it best to keep the seperated
http://plumtickled.typepad.com/plumtickled/2007/08/tutu-tutorial-t.html
Related Posts Plugin for WordPress, Blogger...